
How can we help?
Using older NVIDIA drivers on Linux
Some older NVIDIA drivers are no longer supported by the latest kernels and/or NVIDIA themselves, leading them to be removed from the package managers of popular Linux distributions like Ubuntu and Linux Mint.
Although NVIDIA offers these unsupported driver versions as .run files on their website, there is a good chance they don’t work in your situation because your kernel is too new and/or your distribution made modifications which break the operation of the .run installation file.
If you use a Debian-based Linux distribution like Ubuntu or Linux Mint, you can try the following steps to get an install going for a slew of older NVIDIA drivers.
Keep in mind: make backups and never do this on production hardware. These drivers are unsupported and may break your install or introduce security risks.
Time needed: 20 minutes
- Open a Terminal window
You can find the standard ‘Terminal’ app in your app launcher.
- Install the NVIDIA-Legacy PPA
Ubuntu volunteer kelebek333 took it upon themselves to modify the NVIDIA drivers to function on newer kernels. They built a PPA so you can install the drivers in a ‘healthy’ way for your Linux installation.
Type the following line in the Terminal, hit ‘Enter’ and give an affirmative response to any questions you may receive.sudo add-apt-repository ppa:kelebek333/nvidia-legacy
Note: There is always a little bit of risk with installing a PPA, or “Personal Package Archive”. Anyone can upload programs to the internet and make a PPA available. If the maintainer(s) make updates to the PPA, the Software Update program of your distribution can retrieve them. - Update your package manager’s cache
Type the following in the Terminal and hit ‘Enter’:
sudo apt-get update - Determine the NVIDIA driver version you need
Visit the NVIDIA legacy drivers listing to determine the driver version number (e.g. 340.xx) you need to install. Only the major version number (“340” in the example here) matters.
- Install the driver for your GPU
If you need NVIDIA driver 340, you would type the following in your Terminal and hit ‘Enter’:
sudo apt install nvidia-340 xorg-modulepath-fix
And of course: if you need a different version number, all you need to change is the number, the rest of the line always stays the same. So for version 470 you would enter:sudo apt install nvidia-470 xorg-modulepath-fix
Follow the on-screen process. Answer affirmatively if asked if you’d like to continue installing. If any errors appear on-screen during the process: make a picture or note of the error but don’t worry — it is likely not a large issue. - Restart the computer
You may use the ‘Restart’ option, or fully shut down the computer and turn it on again.
During startup you may see some strange patterns, as if your graphics card has broken. This should resolve itself once the computer gets to the desktop.
Refer to the bottom of this article in case you run into trouble here and get garbled output or no output at all. - Verify that your computer is now running on the GPU driver
Open a Terminal window and type:
sudo lshw -c video
This prints information about video-related hardware to your Terminal.
Check two things:
a) Your video output hardware should not say(UNCLAIMED)next to its name.
b) Look for a line that starts withconfiguration:. This should containdriver=nvidia.
If option A resulted in you spotting a line that does sayUNCLAIMED, you may have to pull a UEFI shenanigan to get this to work.
If option B resulted in you not findingdriver=nvidia, the driver is not active. Check if you have installed the correct driver number for your hardware.
But: if option A and B both had a valid result, congrats! You did it! - Have a look at nvidia-settings
This is not super necessary but will give you ultimate proof that the driver is active. If it is, you will be able to see information about your GPU and make some changes to settings.
Typesudo nvidia-settingsin the Terminal and hit Enter.
If you only see very limited options for the app itself and nothing related to your GPU on the left, the driver is not functioning properly. But if you see options like below, then it’s all good!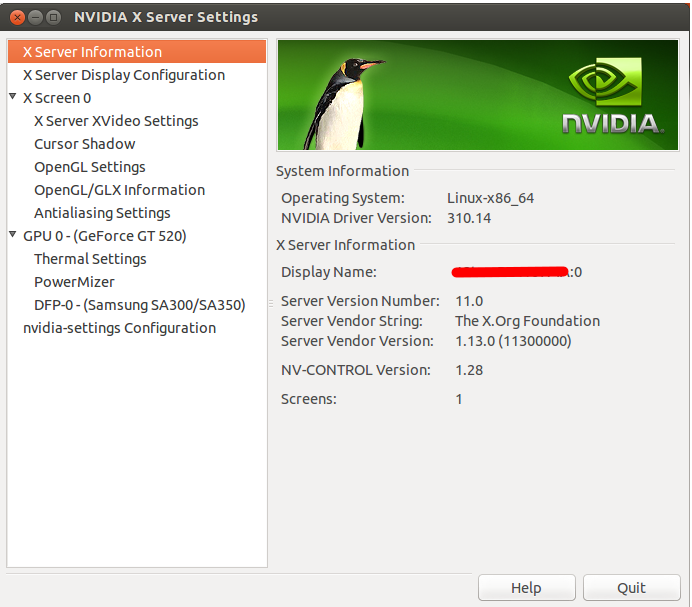
Getting out of trouble
If you don’t see anything or if there are other issues with the output, the installation may have broken something.
You can always press Ctrl+Alt+F1 to get to a fullscreen command line.
Login with your username and password, then type sudo apt remove nvidia-[your chosen driver number] xorg-modulepath-fix and hit Enter to undo what you’ve done in this tutorial.
You can then type reboot followed by Enter to restart the computer, which should now behave as before you started this tutorial.